I had a lot of trouble searching and trying to find out how this could be done so I thought I’d make a post about how I finally got it to work.
Here’s a short version on github of the steps.
Aug 8, 2016 EDIT: I recently reinstalled Raspbian and used Jessie instead of Wheezie so this guide is now slightly out of date for Jessie installs. I plan to get around to making an updated post soon, but if it’s not up just leave a comment and I’ll finish it and put it up.
The question though is why I would ever want to run Processing headless since it is usually used to generate graphics and display them on a screen! The answer is that I want to use Processing to control several FadeCandy’s which I’m using to drive a rgb led matrix.
Step 1: Update software
Recently Processing added support for the Raspberry Pi and arm processors, so we have to be up to date on Processing 3.0.1 (or higher) to get it to export the files to run on the Pi.
Quick side note: I wasn’t able to get surface.setResizable(true) or surface.setSize() to work on the Pi when I ran the sketch, so something to be aware of if you’re getting a weird error that you don’t get on Windows.
I also updated the Pi by running:
sudo apt-get update
sudo apt-get upgrade
Step 2: Create virtual display for the Pi
I followed the directions from Processing available here:
https://github.com/processing/processing/wiki/Running-without-a-Display
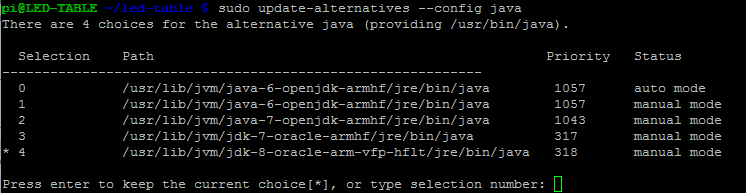
Step 3: Install the correct Java version
Processing 3 seems to require Java version 8, I don’t recall how/when I installed it so you’re on your own for that 😛
Set the version of Java to use by running:
sudo update-alternatives --config java
Step 4: Export and Copy to Pi
Export your sketch by going to: File -> Export Application
Then check the Linux box and click export. Processing will generate a folder called ‘application.linux-armv6hf’ which contains the files we need on the Pi. Copy this folder over to the Pi (I used ftp). Now set the file to executable by running: chmod +x [filename]
Step 5: Run your sketch!
You can now run your sketch by using:
xinit ./[filename]
One last thing to mention is that I’m not sure if the virtual display setup needs to be done every boot, if it does it should be fairly easy to set it up to do so in /etc/rc.local
Edit: Turns out you do need to add this line in your /etc/rc.local file:
export DISPLAY=":1"
Sources:
https://github.com/processing/processing/wiki/Running-without-a-Display
https://www.raspberrypi.org/forums/viewtopic.php?f=28&t=86352

So how about that Jessie install guide? I’m working with a FadeCandy as well and can’t get my Processing sketch to go at launch. Keep having to SSH in at each reboot to run it.
Looks like from my notes that Jessie is fairly similar, but we need to uninstall libgles2-mesa for it to work. It’s been a while since I’ve done this though…
try:
sudo aptitude remove libgles2-mesa
What does your /etc/rc.local file look like?
Got it working just before you replied. 🙂 Was up most of last night trying different methods and this on worked for me this afternoon.
I added this line to the end of the “~/.config/lxsession/LXDE-pi”
@sudo /home/pi/bin/./script.sh
And the script.sh is the following:
#!/bin/bash
DISPLAY=:0 /usr/local/bin/./processing-java –sketch=/home/pi/mysketch –present &
Runs a little slower, but it’s working for tomorrow and that’s what counts.
Glad to hear it’s working! Thanks for posting the workaround as well.